Mastering Some Mysteries of 2-Element Beams Part 2
This talk was originally prepared for the 2002 Dayton FDIM Symposium
This talk was originally prepared for the 2002 Dayton FDIM Symposium
The decision to upgrade a single wire antenna into a multi-element beam marks a major step in QRP station sophistication. Whatever the band, whatever the material, a 2-element array is more than a simple doubling of elements. It represents additional gain, additional directivity, and additional responsibility to know how the thing works.
Last year, I presented a list of topics that seemed to be the most important ones in understanding horizontal 2-element beams:
Unfortunately, space let me only cover 3 of the topics. That leaves three to go--and my promise to cover them in FDIM 7. Since FDIM 7 is here, so are the final 3 topics--with an addition.
Notice that I predict this reaction to your first beam, even without asking what kind of beam you might have. How can we explain such uniform response?

Perhaps Fig. 1 can help us. Overlaid on the polar plot are the azimuth patterns of 3 antennas, each 1 wavelength above ground. The dipole pattern is obvious. The two 2-element Yagi patterns represent a full size Yagi and a smaller, highly loaded version that is not dissimilar in performance to a number of Yagi and non-Yagi designs on the market. As we noted last year, loading a reflector can increase the front-to-back ratio, while loading the driver reduces forward gain.
 . . . . . . . . . . . . . . . . . . . . . . . . . . . . . . . . . . . . . . . . . . . . . . . . . . . . . . . . . . . . . . . . .
                          Performance of 3 Sample Antennas

Antenna                           Forward Gain                      Front-to-Back
                                  in dBi at 14                       Ratio in dB
                                  Deg. TO Angle
Dipole                             7.9                              ---
Full-Size                         11.9                              12.3
Loaded                            10.3                              17.5

Table 1.  A comparison of the performance of three antennas.
 . . . . . . . . . . . . . . . . . . . . . . . . . . . . . . . . . . . . . . . . . . . . . . . . . . . . . . . . . . . . . . . . . . . . .
All three antennas provide good nulls 90 degrees off line, thus cutting QRM from the antenna sides. Relative to the dipole, both beams show a marked reduction in signal strength to the rear, and here is our first piece of magic. What comes from the front seems stronger to our ears in part because it is no longer competing so heavily with signals from the rear. Regardless of the presence or absence of forward gain, the reduction of QRM and QRN from the rear will always make the signal in the forward direction easier to copy.
Let's add up what we obtained from each of the two beams. The loaded beam gives us nearly 3 S-units of rearward quieting (17.5 dB) relative to the dipole, while providing another half-S-unit (2.4) dB of forward gain, for a seeming net of nearly 3.5 S-units of improvement on reception. The full-size 2-element Yagi only gives us 2 S-units of rearward quieting (12.3 dB), while providing over a half-S-unit forward gain (4.0 dB): 2.5+ S-units total apparent receiving advantage. So far, the small, loaded beam seems to have the advantage.
Unfortunately, our installations never have ways to tell which antenna has the advantage on the transmitting side of the coin. However, we know that the front-to-back ratio has no bearing on the signal we send forward. Hence, the full size beam has a 1.6 dB advantage over the loaded beam. Since 1 dB is the minimum discernable difference between signal strengths to the human ear, the full-size beam's slightly higher gain might make a difference at the other end of the line. Indeed, it might make the difference between whether our QRP QSO succeeds or fails.
Rarely do we lack receiver sensitivity and bandwidth filtering. However, a commitment to QRP always carries with it a limitation to our transmitted power. Hence, despite the slight reduction in overall receiving advantage, the slightly higher gain of the full size beam is advisable (unless limited by our yard size, support structure, or money).
However, most first-beam users rely only on what they hear to determine what they claim about their beams. If general use is all we have in mind, then perhaps nothing is wrong in this response. However, I have heard mediocre designs extolled as the finest antennas ever built solely on the user's first response to listening to signals on a beam. In fact, all that we can glean from such reports is that the beam is directional, but not that it is comparatively good relative to other designs.
The lesson: just because you have invested $300 to $500 in your first beam (with equal or greater amounts in support and rotating abilities), do not inflate its performance to match the economic situation. Be modest and let your accomplishments with the new antenna speak for you.

The X-beam was one of the earliest, with the Roman-X following, and finally the folded X-beam as the most compact version. Unfortunately, folded Xs tend to have low gain and large rear quartering lobes, despite the fact that they fit inside a quad loop laid flat.
The VK2ABQ square is related to experiments done on similar squares in the 1930s. Derivative from it is the diamond and the hex beam, the latter combining the pinched center of the X with the close proximity of the element ends. Of the 6 alternatives, only the hex- beam is in commercial production, accompanied by a plethora of maker and user claims. Perhaps what is most significant about the hex is that it is a compact and relatively light- weight design that is directional--whatever the level of performance--and fits small yards or roof tops with a TV rotator for turning power.
What the hex and the square have in common is that they employ two forms of element coupling: the mutual coupling between parallel or nearly parallel elements that we saw in last year's standard Yagi designs and additional coupling between the element ends. Some writers distinguish the coupling forms by calling them inductive and capacitive, respectively.
Perhaps the most refined version of the dual-coupled parasitic array is the Moxon rectangle, a personal favorite, even though I have no monetary interest in the design. It is simply intriguing to me--enough so that I have developed a computer program that yields designs that are compatible with 50-Ohm coax. You need only enter the design frequency and the element diameter--whether wire or tubing--to get working dimensions on any frequency from the AM BC band to lower UHF. Fig. 3 gives the key to the dimension reports.

 . . . . . . . . . . . . . . . . . . . . . . . . . . . . . . . . . . . . . . . . . . . . . . . . . . . . . . . . . . . . . . . . .
                        10-Meter (28.37-MHz) Moxon Rectangle Dimensions

Element          A                B                C                D                 E
#14                               151.4            22.8             4.2               22.3             55.3
#12                               151.3            22.6             4.4               28.3             55.3
0.5"                              150.0            20.6             6.3               28.7             55.6
0.625"           149.8            20.3             6.6              28.7              55.6
0.75"            149.6            20.0             6.8              28.7              55.5
0.875"           149.5            19.7             7.0              28.8              55.5
1.0"                              149.4            19.5             7.2               28.8             55.5

                        12-Meter (24.94-MHz) Moxon Rectangle Dimensions

Element          A                B                C                D                 E
#14                               172.3            26.0             4.7               32.1             62.8
#12                               172.2            25.8             4.8               32.2             62.8
0.5"                              170.7            23.6             6.9               32.6             63.2
0.625"           170.5            23.3             7.3              32.6              63.2
0.75"            170.3            23.0             7.6              32.6              63.2
0.875"           170.2            22.7             7.8              32.7              63.2
1.0"                              170.1            22.4             8.1               32.7             55.2

                        15-Meter (21.20-MHz) Moxon Rectangle Dimensions

Element          A                B                C                D                 E
#14                               202.8            30.8             5.3               37.7             73.8
#12                               202.6            30.5             5.5               37.8             73.8
0.5"                              201.0            28.1             7.9               38.3             74.3
0.625"           200.8            27.7             8.3              38.3              74.3
0.75"            200.6            27.3             8.6              38.4              74.3
0.875"           200.4            27.0             8.9              38.4              74.3
1.0"                              200.3            26.7             9.1               38.5             74.3

                        17-Meter (18.12-MHz) Moxon Rectangle Dimensions

Element          A                B                C                D                 E
#14                               237.4            36.1              6.1              44.2             86.4
#12                               237.2            35.9              6.3              44.2             86.4
0.5"                              235.4            33.2              8.9              44.7             86.8
0.625"           235.1            32.7              9.4             44.8              86.9
0.75"            234.9            32.3              9.7             44.9              86.9
0.875"           234.7            32.0             10.0             44.9              86.9
1.0"                              234.5            31.7             10.3              44.9             86.9

                        20-Meter (14.13-MHz) Moxon Rectangle Dimensions

Element          A                B                C                D                 E
#14                               304.7            46.6              7.5              56.5             110.6
#12                               304.5            46.3              7.8              56.7             110.8
0.5"                              302.2            43.1             10.9              57.3             111.3
0.625"           301.9            42.6             11.3             57.4              111.3
0.75"            301.6            42.1             11.8             57.4              111.3
0.875"           301.4            41.7             12.2             57.5              111.4
1.0"                              301.1            41.3             12.6              57.5             111.4

Table 2.  Moxon rectangle Dimensions:  20-10 meters.
 . . . . . . . . . . . . . . . . . . . . . . . . . . . . . . . . . . . . . . . . . . . . . . . . . . . . . . . . . . . . . . . .
We shall look briefly at other Moxon dimensions when we touch on lower HF wire beams. The most critical dimension is the gap between element ends. Combined with the general shape--either more square or more rectangular--the gap sets the operating impedance of the array. The other dimensions--except perhaps for the driver tail lengths to bring the array to resonance on the design frequency--change slowly. The overall front-to-back dimension (E) changes very slowly with wide differences in element diameter.
Before we look at how to build a Moxon and how it performs across a full ham band, let's see what reasons we might have for selecting a Moxon. First, for a given band, the side-to-side dimension is about 70% of the same dimension on a full size Yagi. Hence, the 35' elements of a 20-meter Yagi shrink to about 25' in the Moxon.
Second, the pattern of a Moxon is desirable in some circumstances.

Fig. 4 compares the azimuth pattern of a Moxon with that of a full-side Yagi, with both antennas 1 wavelength above ground and an elevation angle of 14 degrees. The Moxon sacrifices about 0.5 dB of gain, but gives it back in the form of a wider beamwidth. Note that the Moxon does not shows its deepest pattern nulls at 90 degrees off the forward heading. The angle is closer to 120 degrees each side of the forward bearing. For a simple installation, we obtain wider coverage without turning the beam. The high front-to-back ratio of the Moxon is obvious: 20 dB is a normal average across a ham band, with the peak at the design frequency. The originator of the rectangle, Les Moxon, G6XN, subscribed to the good ears theory of operation: if you cannot hear them, you cannot work them. He also used a fixed installation.

Fig. 5 shows two ways to install a wire version of a Moxon. We can make a cheap fixed installation using 4 posts and ropes. We can set and preserve the gaps between tails by running a cord from the front corner to the rear corner. If we use a piece of PVC instead of rope, with the tails taped to it, we might get by with just a post on either end of the array. For further thoughts on wire installations, see my QST article on "Having a Field Day with the Moxon Rectangle," in the June, 2000 issue.
My original Moxon was described along with a brief history of the design's evolution from VK2ABQ squares in "Modeling and Understanding Small Beams: Part 2: VK2ABQ Squares and The Modified Moxon Rectangle," Communications Quarterly, (Spring, 1995), 55-70. That version used nonconductive support rods from a central plate to hold the wire in place--again, with a cord from front-to-back on each side to keep the tails and gap fixed in position. This version permitted me to rotate the beam.

Fig. 6 outlines the basic parts of a Moxon with tubular elements. The boom--conductive or non-conductive--supports plates made from varnished plywood or polycarbonate, and the plates support the elements. To preserve the gap, insert a small length of rigid tubing, such as CPVC, into each tail end and fasten in place.
You can make rounded corners by carefully bending sections of aluminum tubing. Alternatively, you can use small triangular plates to join the main and tail portions of the elements. One enterprising Australian builder used the corners of defunct lawn chairs for his Moxon. Ingenuity is the key. You can find additional construction hints in "An Aluminum Moxon Rectangle for 10 Meters," The ARRL Antenna Compendium, Vol. 6 (Newington: ARRL, 1999), pp. 10-13.
If you use stepped diameter tubing, here is how to compensate. First, select the dimensions for the average size of the tubing that you plan to use, taking into account the length of each size used. Then, use the gap dimension for the size tubing that forms the gap. The results will by very close to precisely on target.

Good precision in construction is always sound advice, but the Moxon plays very well without undue fussiness. The impedance performance is very broad, as shown by the 50-Ohm SWR curve for 28.0-29.0 MHz in Fig. 7. The curve is for a tubular model, and the angles will be more extreme for a thin-wire version. Nevertheless, there is plenty of room for a wire version to cover 1 MHz of 10 meters with under 2:1 SWR, and if the beam covers 10, then scaled versions will easily cover all of the bands from 20 through 10 meters.
As you can see from the curve, the SWR below the design frequency rises more rapidly than above the design frequency. Therefore, for the wide ham bands, I set the design frequency a little over 1/3 the way up the band.

Peak front-to-back ratio--whether interpreted as the 180-degree ratio or the worst-case ratio--occurs on the design frequency. As shown in Fig. 8, it remains well above 15 dB at the band edges and averages more than 20 dB across the band. Like all 2-element driver-reflector parasitic arrays, the forward gain decreases as frequency increases. In common with other arrays with shorter side-to- side lengths, the gain decrease curve is steeper than for a full size Yagi with the same front-to-back element spacing. However, the gain is highest in the most used part of the band, from 28.0 to 28.6 MHz.
The Moxon can be redesigned for other impedances. At my website are notes on designing 95-Ohm versions of the antenna to simplify making turnstile pairs for satellite communications. Turned on edge, the Moxon rear null makes a fine detector for direction finding (fox hunting). Although Moxons do not do well when we nest them for several bands, it is possible to use a 20 meter Moxon in place of a 20-meter Yagi in such commercial tri-banders as the Force 12 C-3. If the C-3 does not fit our property, perhaps a 25' wide Moxon-ized version might.
In the end, the Moxon serves us here as a prime example of possibilities for using alternative geometries for our 2-element beams. What we may lose in gain, we might more than make up for in terms of other advantages that may suit some specific operating needs.
Originally, these antennas competed with primitive Yagi designs that had not yet been optimized by computer simulations. The phased 2-element arrays received a highly inflated gain estimate based on the poor performance of the Yagis. To this day, they sustain a numerical reputation that has no justification. However, they do have some interesting advantages over the standard 2-element Yagi.
With element spacing in the vicinity of 1/8 wavelength, 2 elements with any configuration have limits to their gain, no matter whether we phase them for maximum gain or maximum rear null. See Fig. 9.

The maximum free-space gain in the maximum-null situation is about 6.2 dBi, about the same or slightly less than the standard 2-element Yagi. In the maximum-gain situation, the gain might rise to about 7.3 dBi, about the same as a 2-element quad. However, the front-to-back ratio goes to pot.
It is possible to find an intermediate situation in which we raise the maximum gain to about 6.6-6.7 dBi while sustaining a 20 dB front-to-back ratio. The added gain is useful although marginal. The increased front-to-back ratio--about 6-7 dB higher than a standard full-size Yagi--is the source of the phased array's reputation, since we tend to judge with our ears and not with test instruments. However, if you hear of gain claims for a 2-element phased array that claim a free-space forward gain above 7 dBi, try not to believe them.
The 2-element horizontal phased array has sufficient advantage over a 2-element Yagi that it bears a quick investigation. We shall look at the basic design of each generic type and some variations of each. Our goal will be to find one or more that we might build for ourselves. That goal turns out to be harder than it appears.
A. Direct-Phased or ZL-Special Arrays: The original ZL-Special appeared in the late 1940s and early 1950s, and came in several styles, all of which rested on a mistake. Fig. 10 surveys some of the early breeds of ZL-Specials.

All of the versions of the ZL-Special labored under the belief that the phasing of two elements depended on the length of the transmission line between the two elements in its function to transform impedance. Designers sought a 135-degree impedance transformation, so they used a 45-degree (1/8 wavelength) line with a half twist. The trombone tries to account for the velocity factor of the line.
In fact, phasing is a function of the relative current magnitudes and phases on the two elements--not the impedance at the element feedpoints. As well, the rear element when spaced about 1/8 wavelength from the forward element needs a phase angle close to -45 degrees. The difference between 135 and -45 degrees makes no difference to impedance, since the impedance repeats itself every 180 degrees. However, current repeats itself only once per 360 degrees, and the -45-degree value is a better guide to what adjustments have to be made to a given design.

Fig. 11 shows the basic elements of a fundamental ZL-Special design. The key questions are these: how long are the elements for a given element diameter? How far apart do we space the elements? What value of transmission line will work to transform the current magnitude and phase from the forward element to the rear? How long should we make the line? What treatment do we need at the combined feedpoint to match a 50-Ohm main feedline to the antenna?
Let's roughly design a workable ZL-Special. We shall use 28.5 MHz as our design frequency and keep all dimensions in terms of wavelengths. The elements will be 1/2" in diameter, or 0.00121 wavelength. Now let's select a forward element length of 0.465 wavelength and a rear element length of 0.506 wavelength, with a 0.125 (1/8) wavelength spacing. From last year's notes, we know that we could choose other element spacings, as long as we selected the correct relative current magnitude and phase angle for the elements--and assuming that we might obtain it with existing transmission lines.
Early tubular-element ZL-Specials tended to use 75-Ohm line for phasing work. Actually, to achieve the required current phase relationships, a line nearer to 25 Ohms works best. Since such a line is not available, let's see what happens if we use RG-83, a 35-Ohm line (available from the Wireman of South Carolina). An electrical length of 0.197 wavelength will work, and since this length translates into a physical length of 0.13 wavelength with the line's 0.66 velocity factor, it will fit the space between elements. The pattern that results appears in Fig. 12 and is highly promising.

The gain is a bit above a 2-element Yagi, but the front-to-back ratio is superlative. However, we have one more obstacle to overcome. The feedpoint impedance at the junction of the first element and the phase line is 20 Ohms. We can fix this problem by using a 0.197 electrical wavelength (0.13 physical wavelength) of the same RG-83 to form a matching section. With this line in place, we obtain the SWR curve of Fig. 13.

Compared to a directly fed system, the 50-Ohm SWR curve is backward, sloping more gently below the design frequency. That phenomenon is a function of the matching section. We easily obtain under 2:1 SWR across the first MHz of 10 meters, and what works on 10 scales nicely for the other upper HF bands.

Fig. 14 shows the anticipated gain and front-to-back curves across 10 meters. A phased array usually shows the gain curve of a Yagi with 1 or more directors: it rises with frequency. The ends and middle of the curve are about a quarter dB higher than the curve for a full-size Yagi.
The front-to-back curve--shown as 180-degree values--is better than virtually any full size 2-element Yagi, dipping below 20 dB only at the upper end of the band.

Fig. 15 shows the free-space patterns near the band edges to demonstrate that the antenna in fact performs well across the band. However, that fact does not mean that the antenna is easy to build. RG-83 costs $3/foot, but that is its least problem. If we wish to build this antenna, then we will need a non-conductive boom--perhaps PVC. Such booms are practical only on 10 and perhaps 12 meters due to weight and sag.
We need the non-conductive boom due to the fact that the phase line has a reversal along the way. Under these conditions, the line may unevenly couple energy to a metallic boom, which is normally connected to the mast and ultimately to ground. Any such coupling disrupts the current magnitude and phase relationships between elements. We might try some large ferrite decoupling shells over both ends of the coax to suppress currents on the outer portion of the phaseline, but quickly our little array takes on more weight than we might wish.
Let's try a variant that is easier to build. Roy Lewallen, W7EL, introduced what he called the Field-Day Special. For more details than we have room for here, see his original article: "Try the 'FD Special' Antenna," QST (Jun., 1984), 21-24. The outlines of a 10-meter version appear in Fig. 16.

Roy wanted a Field Day antenna that he could roll up and carry to mountain sides and tops, so he used common parallel line with folded dipole elements and a 300-Ohm feedline. The element lengths show two sizes: the shorter is for common 450-Ohm line, which is stronger, and the longer is for 300-Ohm line, which is lighter. Actual lengths may be 1-2% shorter due to the insulation on the wire. In the analytical model, the phase line is 4.9' long (0.142 wavelength) and accounts for the 0.8 velocity factor of the phaseline material. This length is slightly longer than the 4.27' (0.124 wavelength) spacing of the elements. The feedpoint impedance is between 40 and 50 Ohms resistive, but has some inductive reactance. Hence, Roy added series capacitor on a small plate at the feedpoint. 90-110 pF per capacitor will compensate and yield a mostly resistive feedpoint impedance for a coax feedline.

Fig. 17 shows free-space patterns for the middle and ends of the 10-meter band (first MHz) to demonstrate that the antenna has potentially the same properties as a ZL-Special composed of tubular elements. The actual curves are very similar to those in Fig. 13 and Fig. 14. You may scale the antenna for any of the ham bands and expect similar results. Tied to supports (like those for a wire Moxon), the antenna is a simple and inexpensive field antenna--and not a shabby home antenna as well. See Roy's article for the stub techniques he used to switch directions for the array.
Although it is conventional in a directly phased ZL-Special to join the phase line to the forward element, there is no rule that says we must do the job this way. All we want to obtain is a set of current magnitude and phase values on the two elements that will give us the best compromise between gain and front-to-back ratio for a set of elements and a certain spacing between them. Fig. 18 shows an alternative arrangement for the phase line and the feedpoint.

The elements of this design are identical to those of the original tubular ZL-Special. The diameter is 0.5" (0.00121 wavelength), with the forward elements 0.465 wavelength long and the rear element 0.506 wavelength long. The element spacing is 0.125 wavelength. The key difference is that we shall presume that RG-83 is unavailable, but we do have some RG-8X with a velocity factor of 0.78.
As we noted early in our exploration of ZL-Specials, higher impedance lines do not achieve the correct relative current magnitudes and phase angles that we need. Now we must add the qualification that they fail if we use the junction of the phaseline and forward element as the feedpoint. However, we can alter the relative phasing by using a short length of phaseline between the forward element and the junction that forms the feedpoint.
For the current design, the forward length is physically 0.015 wavelength (electrically 0.019 wavelength), while the rearward section is physically 0.13 wavelength (electrically 0.167 wavelength)--both made of RG-8X. The net impedance is just about 25 Ohms. Hence, a 1/4 wavelength section of paralleled RG-59--adjusted for the velocity factor of the foam or solid core line used--gives us a close match to our 50-Ohm main feedline.

Fig. 19 shows the performance patterns at the middle and ends of the first MHz of 10 meters--very similar to those of the other 2 variants on the ZL-Special. Like the initial ZL-Special design, the phase line requires a non-conductive boom or a method of decoupling the phase line outer braid. For construction details of one such array, see "Two Hilltoppers for 10 Meters: a Dipole in a Tube and a Beam in a Boom," The ARRL Antenna Compendium, Vol. 6 (Newington: ARRL, 1999), pp. 1-9.
B. Matched-Phased or HB9CV Arrays: Although the English-speaking world tends to favor ZL-Special phased arrays, the European continent finds greater favor in the HB9CV horizontal phased array. However, proponents of the design are no less prone to inflating the performance potential. The HB9CV and its variants differ from the ZL-Special only on the technique of phasing, not in performance potential. However, the matched-phasing system of the HB9CV and its variants does offer a degree of flexibility in design so that the end product--although more difficult to build--tends to yield more reliable results.

As shown in Fig. 20, the HB9CV phased array comes in two major varieties, with many variations. By pure experimentation, the developer came up with elements lengths that are 0.46 wavelength forward and 0.50 wavelength rear, with a spacing of 0.125 wavelength. The prescribed element diameter range is 0.004 to 0.007 wavelength, much too fat for modern building: 1.5" at 10 meters. Hence, some adjustment is necessary.
The key to the HB9CV is the Tee or Gamma match system applied to each element. The separate functions of these sections has often been overlooked. The rear element matching section alters the rear element feedpoint impedance until it is a close match with the phase line. The match will not be 300 Ohms for the Tee or 75 Ohms for the gamma. Instead, it will be whatever impedance a physical 1/8 wavelength line will show when we take the line's velocity factor into account. Once matched, the current transformation of magnitude and phase angle along the line will track very closely with the impedance transformation, resulting in close to optimal values on the rear element.
The forward element matching section in the version shown has a different function. The junction of the phase line and the forward elements will normally show a low impedance. The forward gamma provides a match to the main feedline. These two functions lie at the heart of all of the variants on the HB9CV. They also allow the designer to customize a design to a set of building blocks--element sizes, element spacing, and phase-line type--and still obtain the desired patterns.
The HB9CV is capable of broad-band performance with consistent properties across any upper ham band (including versions up to at least 2 meters), as evidenced by the patterns in Fig. 21 for the Tee version of the array. The 50-Ohm SWR is well under 2:1 across the band.

The HB9CV has the advantage of permitting direct boom-to-element mounting. However, for the newer home builder, it holds a disadvantage: the exact dimensions of the element lengths and the matching sections will very from one selection of material size to the next. Hence, casual building of an HB9CV often results in a relatively mediocre antenna that fails to achieve the patterns shown. However, if we apply the matching principles in somewhat different ways, we can come closer to something that we can build and adjust in the backyard.
A recent design has emerged from Eric Gustafson, N7CL, and is available from CAL-AV in 30- and 40-meter versions. Let's look at the basics of the design in Fig. 22 and adapt them to upper HF regions.

The N7CL design makes use of beta matches at each element feedpoint. We described the principles of the beta match in the FDIM-6 presentation. Briefly, we shorten each element until it shows a capacitive reactance of about -j20 to -j40 Ohms, depending on the matching needs. We then add a shunt inductive reactance to raise the impedance to a desired level. So we expect the N7CL elements to be a bit shorter than the corresponding HB9CV or ZL-Special elements. For 1/2" elements, the forward elements is 0.445 wavelength and the rear element is 0.477 wavelength. The spacing is also closer: 0.111 wavelength.
The elements require insulated mounting--using plates such as those shown for the Moxon rectangles. The 100-Ohm phaseline will be isolated from the metallic boom: we shall build it from two sections of 50-Ohm cable. RG-8X has a velocity factor of 0.78, so the required line length will not show the same value physically as it does electrically. A physical length of 0.131 wavelength allows us to pass the cable through the boom and connect it to the elements at each end.
The rear stub must raise a natural impedance of about 16 Ohms resistive with nearly -j40 Ohms of capacitive reactance to about 100 Ohms resistive. A 50-Ohm shorted stub with an electrical length of about 0.111 wavelength will do the job. The combined phase-line/forward-element impedance at the feedpoint is also low and capacitively reactive: about 21 - j22 Ohms. So we need another beta shorted stub of 50-Ohm cable, this time, about 0.126 wavelength electrically. Now we have a pretty good match to a 50-Ohm feedline across 10 meters. We may tuck these stubs into the boom ends to keep them out of the weather.

Fig. 23 shows the potential performance of the N7CL design. Because the rear element has an impedance transformation that reverses the reactance transformation across the band as seen by the forward elements, the gain curve is the reverse of all of the other phased arrays that we have observed. However, like all of the other phased arrays, it out-performs a reflector-driver Yagi by about a quarter dB. The front-to-back ratio drops below 20 dB only at the upper end of the first MHz of 10 meters. It should be a straightforward task to scale this design to the other upper HF bands so that the peak performance ends up in the best part of the band.

The 50-Ohm SWR curve shown in Fig. 24 shows one slight limitation of the N7CL design on 10 meters: the array just barely makes the 2:1 limit that we normally use as a standard. However, this limitation will not be a problem on the narrower 20 and 15 meter bands.
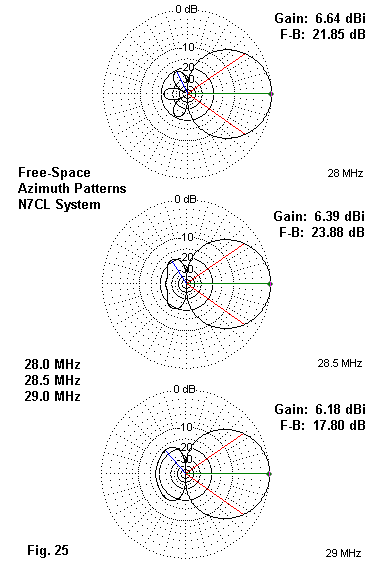
Fig. 25 samples the performance of the N7CL design at checkpoints across the band.
What HB9CV does with gamma and Tee matches and N7CL does with beta matches, we can also achieve in other ways. For example, if we lengthen the elements, the naturally low impedance of an all-fed array will slowly rise. At a certain length and spacing the rear element will show a 100 Ohm impedance, accompanied by a inductive reactance. With a 100-Ohm phase line, the combined forward element and phase line junction will show a 50-Ohm impedance, also accompanied by an inductive reactance. Fig. 26 shows the outline of such an array.

In this array, the rear elements is 0.622 wavelength, with a 0.601 wavelength forward element, using our standard half-inch 10-meter elements. The spacing is 0.145 wavelength, wider than the other arrays. The phaseline will be the same dual RG-8X that we used in the N7CL array.
The physical line length in the example is 0.145 wavelength (0.186 wavelength electrically), although minor changes in length have little effect on performance. On the plate used to insulate the rear element from the boom, we add a 50 pF capacitor to each side of the line (for a net 25 pF of reactance compensation). At the forward end of the line, we need a pair of 30 pF capacitors (net 15 pF, since they are in series) to compensate for the feedpoint reactance. The result is a broadband response across the 28.0-29.0-MHz span that makes SWR a matter of little significance. In fact, the antenna is sufficiently broadband to allow the use of twin 75-Ohm cable for a phase line with little change in performance.

The sample patterns in Fig. 27 reveal that the capacitively matched phased array has a little more gain than the other phased arrays. This bonus results from the use of elements that are about 20% longer than standard. Indeed, we can continue to squeeze more gain from the array while maintaining the front-to-back ratio properties by increasing the element diameter and length, and by further increasing the spacing.
I have presented this array of phased arrays mostly to show what is possible (and reasonable) for 2-element arrays. The arena of 2-element phased arrays still resounds with excessive claims and more than a little unsubstantiated rationales. In the end, however, with the 2-element phased array, we get a little more because we put a little more into them by way of obtaining more optimal relationships between the element current magnitudes and phases.
The following table will give you a summary view of the situation. It compares the performance of a narrow-band driver-director Yagi, a broad-band driver-reflector Yagi, a standard ZL-Special array, and the N7CL phased array, when all antennas are 1 wavelength above average ground.
. . . . . . . . . . . . . . . . . . . . . . . . . . . . . . . . . . . . . . . . . . . . . . . . . . . . . . . . . . . . . . . . . .
                   Comparative Performance Figures of 2-Element Arrays
                      All Arrays 1 Wavelength Above Good Ground at 28.5 MHz

1.  Reflector-Driver Yagi
Dimensions in wavelengths:
Reflector        Driver           Element            Element
Length           Length           Spacing            Diameter
0.5028           0.4620           0.1250             0.001207 (0.5")
Performance:
Gain             TO Ang.          2nd Lobe           Angle          Main-             Front
                                                                    2nd               -Back
dBi              degrees          Gain dBi           degrees        Lobe              Ratio
                                                                    Ratio dB          dB
11.61            14               9.35               46             -2.26             12.52

2.  Driver-Director Yagi
Dimensions in wavelengths:
Driver           Director         Element            Element
Length           Length           Spacing            Diameter
0.4972           0.4670           0.0750             0.001207 (0.5")
Performance:
Gain             TO Ang.          2nd Lobe           Angle          Main-             Front
                                                                    2nd               -Back
dBi              degrees          Gain dBi           degrees        Lobe              Ratio
                                                                    Ratio dB          dB
11.83            14               9.49               46             -2.34             19.58

3.  ZL-Special
Dimensions in wavelengths:
Rear El.         Fwd El.          Element            Element        Phaseline--Note 1
Length           Length           Spacing            Dia.           Length        Zo      VF
0.5060           0.4650           0.1250             0.0012         0.1300        35      0.66
Performance:
Gain             TO Ang.          2nd Lobe           Angle          Main-         Front
                                                                    2nd           -Back
dBi              degrees          Gain dBi           degrees        Lobe          Ratio
                                                                    Ratio         dB
11.68            14               9.51               47             -2.17         31.62

2.  N7CL Phased-Array with Rear-Element-Matching
Dimensions in wavelengths:
Rear El.         Fwd El.          Element            Element        Phaseline--Note 2
Length           Length           Spacing            Dia.           Length        Zo      VF
0.4972           0.4670           0.0750             0.0012         0.1314        100     0.78
Performance:
Gain             TO Ang.          2nd Lobe           Angle          Main-         Front
                                                                    2nd           -Back
dBi              degrees          Gain dBi           degrees        Lobe          Ratio
                                                                    Ratio         dB
11.74            14               9.49               46             -2.25         31.44

Note 1:  ZL-Special uses a feedpoint impedance matching section.
Note 2:  N7CL array uses shorted stubs for rear-element matching and for feedpoint matching.

Table 3.  Comparative performance figures of sample 2-element arrays with all arrays 1 wavelength above good ground at 28.5 MHz.
 . . . . . . . . . . . . . . . . . . . . . . . . . . . . . . . . . . . . . . . . . . . . . . . . . . . . . . . . . . . . . . . .
The table reveals several facts of interest. First, the phased array extra gain is not especially significant in operation. Second, the phased array shines in obtaining the front-to-back ratio associated with the narrow-band driver-director array, but spreading it over the broad frequency span associated with the driver-reflector array. Third, there is no significant difference among all of the elevation data relative to second lobe-first lobe comparisons.
The 2-element phased array is a distant cousin of the log periodic dipole array (LPDA). There are designs for larger arrays and for multi-band arrays that use 2 or three phased elements for drivers, along with some parasitic elements. Since many of the designs do not follow LPDA formulas or follow any of the design principles shown here, but instead emerge from experimental work, precisely classifying these hybrid driver sets is an exercise in futility.
Because 2-element phased arrays tend to be specialized monoband antennas, I shall not provide a set of building tables as I did last year for the Yagis. However, you may develop your own dimensions using a fairly straightforward technique that employs antenna modeling software such as EZNEC or NEC-Win Plus. These programs use NEC-2 and a set of substitute uniform-diameter elements for cases where a linear element near resonance uses stepped-diameter construction. Here is how to adapt the basic designs shown here to your proposed band of operation and tubing schedule.
1. First, scale the design from the 10-meter design frequency (28.5 MHz) to the new design frequency in one of the other upper HF ham bands. Take the inverse of the frequency ratio and multiply it times the present element lengths and spacings. (EZNEC contains an automatic scaling function which will calculate the new element lengths, spacing, and transmission line lengths.)
2. Record the new element lengths. Now replace the elements by the more complex collection of tubing lengths that make up the stepped-diameter elements. For the outer or tip element limit, start with the original tip limit. However, check the substitute element chart and find what the outer dimensions are for each element. Adjust the tapered tip until the substitute element yields the same uniform substitute element length as you determined from the simple scaling.
3. Check the modeled performance and make any fine adjustments necessary to obtain the performance curves of the original scaled model--or to improve on them.
If you have always been a little fearful of modeling antennas, you may wish to explore the new ARRL on-line NEC-2 modeling course. By the end of the course, the technique that I just described will seem simple and obvious.
Now build your favorite 2-element phased array.

Let's begin by specifying dimensions for 2-element reflector-driver Yagis for 80, 40, and 30 meters. Fig. 28 shows the general outline of the antenna so that you may correlate the dimensions to a plan. All of the antennas use a direct coax feed for simplicity of construction. In Table 4, all dimensions are in feet and the wire size is either AWG #12 or #14 copper.
. . . . . . . . . . . . . . . . . . . . . . . . . . . . . . . . . . . . . . . . . . . . . . . . . . . . . . . . . . . . . . . . . .
                           #12/#14 Wire Yagis

Element                           Length                            Spacing
3.6 MHz
Reflector                         138.0                             -----
Driver                            130.2                             39.4
3.9 MHz
Reflector                         127.4                             -----
Driver                            120.2                             36.4
7.1 MHz
Reflector                          70.0                             -----
Driver                             66.0                             20.0
10.125 MHz
Reflector                          49.0                             -----
Driver                             46.2                             14.0

Table 4.  Wire Yagi dimensions for 80-30 meters.
 . . . . . . . . . . . . . . . . . . . . . . . . . . . . . . . . . . . . . . . . . . . . . . . . . . . . . . . . . . . . . . . .
To use these dimensions, we must keep in mind some of the design elements behind them. First, the dimensions are for bare wire. Insulated wire elements will be anywhere from 1% to 4% shorter due to an antenna velocity factor (which is not the same as a transmission line velocity factor). The physical length of an insulated wire will be shorter than the physical length of a bare wire of the same size for the same electrical properties. Unfortunately, the amount of required shortening depends upon the dielectric constant of the insulating material and the thickness of the insulation. Since hams obtain their wire from many sources, almost all of which do not clearly specify either property, I cannot give you a table of values to guide the required adjustments.
Second, the spacing of the wires is about 0.144 wavelength, which yields a feedpoint impedance between 40 and 50 Ohms for these beams. Had I used 1" diameter elements, the element lengths would have been 2% shorter, which we would expect. However, to achieve a near-50-Ohm feedpoint impedance, I would have had to increase the spacing to about 0.160 wavelength--a considerable increase. The difference stems from the increased fat-element mutual coupling (or the decreased thin-wire mutual coupling) for a given spacing of wires. One of the consequences of this difference is a narrowing of the SWR bandwidth of a thin-wire Yagi, as shown in the 40-meter SWR comparison of SWR curves in Fig. 29.

Third, thin copper wire will have higher losses than fat aluminum, despite the conductivity advantage of copper. The driver losses result in a gain reduction of about 1/2 dB when we compare #12 to 1" elements, an 8:1 diameter difference. Hence, a 6.2 dBi free-space gain drops to the 5.7 dBi level. However, reflector losses tend to increase the front-to-back ratio, and the wire Yagi has a slight advantage over the tubular version. The pattern in Fig. 30 shows the differentials in both directions for our sample beams.

Fourth, wire beams for the lower HF region are normally constructed at heights well below 1 wavelength. Most such antenna are between 1/3 and 2/3 wavelength up, with many 80/75-meter antennas well below 1/3 wavelength. Such mounting heights have a number of properties to which we must adjust when we make a wire beam. Below 1/3 wavelength, a horizontal antenna--including a Yagi--has such a high elevation angle of maximum radiation (Take-Off or TO angle) that if we cannot get the antenna higher, then we may wish to consider other beam types--such as a parasitic half-square. The lesser gain but lower radiation angle may give us better results. For reference, Table 5 gives us the heights for the lower bands for 0.375, 05, and 0.625 wavelength. Except for tower owners or North Woods operators, 5/8 wavelength is about as high as we shall mount even a 30-meter wire beam.
 . . . . . . . . . . . . . . . . . . . . . . . . . . . . . . . . . . . . . . . . . . . . . . . . . . . . . . . . . . . . . . . . .
                                      Height in Feet of Some Beam Levels

Wavelength                                         Frequency
                                  3.6              3.9              7.1           10.125
0.375                             102.5             94.6            51.9          36.4
0.5                               136.6            126.1            69.3          48.6
0.625                             170.8            157.6            86.6          60.7

Table 5.  Heights in feet for typical beam mounting heights in wavelengths for some lower HF
frequencies.
. . . . . . . . . . . . . . . . . . . . . . . . . . . . . . . . . . . . . . . . . . . . . . . . . . . . . . . . . . . . . . . .
On 80 and 75 meters especially, a wire Yagi will be difficult to elevate even to the 3/8 wavelength level.
Below 1/3 wavelength, most Yagis shows wide excursions in the feedpoint impedance with small changes in height. Between 3/8 and 5/8 wavelength, the feedpoint impedance changes slowly, but still may require adjustment of the driver length from planned dimensions. However, not only does the feedpoint impedance change significantly with height in this low mounting region, but so do the operating characteristics. Any horizontal antenna will show a gain peak at about 0.625 and 1.125 wavelength, and a gain low at about 0.375 and 0.875 wavelength. At higher mounting levels, these phenomena become very slight, but at low levels, the changes are noticeable in operation. In contrast to gain, the front to back ratio changes in much the opposite direction, with higher values near the 3/8 wavelength mark and lower values higher up.
Of course, to this list of changes with height, we must add the TO angle. That angle is in the 34-35-degree level--with a single vertically fat lobe--when the antenna is at 3/8 wavelength and drops to about 22 degrees with a single vertically thinner lobe as we move to the 5/8 wavelength level. Understanding all of these effects of changing antenna height is critical to making the right decisions as we plan a wire beam for one of the lower HF bands. Fig. 31 summarizes many of these differences by showing typical azimuth patterns for a 2-element Yagi at the various heights that we have discussed.

One Yagi variant--the Moxon rectangle--shows some resistance to these changes at low heights. The feedpoint impedance of a Moxon rectangle changes very little from about 1/4 wavelength above ground on upward. As well, the Moxon rectangle, even when built from wire as thin as AWG #14 (0.0641" diameter), can cover all of 40 meters (see Fig. 32).

For reference, Table 6 lists some dimensions for 50-Ohm Moxon rectangles for the lower HF region, with dimensions in feet. The side-to-side dimension remains at about 70% of the corresponding Yagi dimension. Use Fig. 3 as a guide to the application of these dimensions.
 . . . . . . . . . . . . . . . . . . . . . . . . . . . . . . . . . . . . . . . . . . . . . . . . . . . . . . . . . . . . . . . . .
                             Lower HF Moxon Rectangle Dimensions

Freq.            A                B                C                D             E
3.6              99.98            15.47            2.16             18.33         36.96
3.9              92.28            14.28            2.00             16.92         33.20
7.1              50.69             7.82            1.15              9.35         18.32
10.125           35.47             5.45            0.84              6.56         12.85

Table 6.  Some Moxon rectangle dimensions (in feet) for lower HF bands for AWG #14 copper wire.
 . . . . . . . . . . . . . . . . . . . . . . . . . . . . . . . . . . . . . . . . . . . . . . . . . . . . . . . . . . . . . . . .
Although the Moxon rectangle cannot lower the TO angle relative to a Yagi, it begins to shine in other comparative categories at low mounting heights, as suggested by the typical azimuth plots in Fig. 33. The gain meets or exceeds the corresponding Yagi gain (in Fig. 31), and the front-to-back ratio is at least 9 dB better--a full 1.5 S-units.

Since we cannot normally rotate a wire beam, one common technique for working in at least two main directions is to create a reversible beam. There are more ways than one to achieve this goal, but let's explore a pair of typical designs. The first technique is applicable to both the Yagi and the Moxon rectangle. We simply create two driven elements instead of one. Then we load one of the elements with a transmission line stub. The stub--when on the driver--becomes a part of the overall transmission line from the shack, so we shall use 50-Ohm cable for our stubs.

Fig. 34 shows the general outline of Yagi and Moxon rectangles set up for reversal of direction. Whatever the band, the Yagi uses the driver dimension already shown for both elements. Each element center comes down via a 50-Ohm cable to a central remote switching box. The Moxon rectangle uses the driver dimensions including A, B, and C (gap) in the charts and then repeats the A and B dimensions for the other element.
The switch changes both the center and braid connections to keep the stubs totally independent of each other. The Yagis need a stub reactance of about 75 Ohms (whatever the band) to load the element into reflector service. The Moxon rectangle need about 70 Ohms for similar service. Table 7 lists the electrical lengths of two kinds of stubs: shorted stubs less than 1/4 wavelength long and open stubs greater than 1/4 wavelength long. You may also add exactly 1/2 wavelength to either type of stub if you need additional stub length to reach the switch position. Be sure to multiply the electrical lengths in the chart by the velocity factor of the line you might use for the stub. In most cases, solid dielectric lines have a velocity factor close to 0.66, while foam lines have a value close to 0.78. Table values are in feet.
 . . . . . . . . . . . . . . . . . . . . . . . . . . . . . . . . . . . . . . . . . . . . . . . . . . . . . . . . . . . . . . . . .
                        Basic Stub Lengths to Load Reflectors

75-Ohm Stubs
Freq.                             Shorted                           Open
MHz                               Length                            Length
3.6                               42.8                              111.0
3.9                               39.5                              102.5
7.1                               21.7                               56.3
10.125                            15.2                               39.5
70-Ohm Stubs
Freq.                             Shorted                           Open
MHz                               Length                            Length
3.6                               41.4                              109.7
3.9                               38.2                              101.3
7.1                               21.0                               55.7
10.125                            14.7                               39.0

Table 7.  Some open and shorted stub electrical lengths.
 . . . . . . . . . . . . . . . . . . . . . . . . . . . . . . . . . . . . . . . . . . . . . . . . . . . . . . . . . . . . . . . .
You can find equations for calculating stubs in most antenna manuals. Remember that transmission line stubs are not without some loss, and the longer the stub line, the greater the losses. The chief effect will be a slight loss of gain (added to the loss we experienced by going from fat to thin elements). However, the front-to-back ratio will give our beam some good directional properties, and we shall still have very usable forward gain.
In addition to adding switching complexities and some losses to our array, the direction-reversing scheme will also narrow the operating bandwidth of the beam somewhat. However, the array will remain a direct-feed 50-Ohm beam. Fig. 35 shows the anticipated 50-Ohm SWR curves for reversible Yagis and Moxons. Note that the loading affects the Yagi curve slightly more than it alters the Moxon curve.

For those who may have only 1 or 2 tall supports, Carrol Allen, AA2NN, has developed a diamond-Vee version of the Moxon. In fact, when thinking about making either a Yagi or a Moxon into something like an inverted Vee for simpler construction, it is wise to think of the diamond-Vee instead. See Fig. 36.

Let me describe the 40-meter version of this antenna, and you can do whatever scaling may suit your own location and operating desires. The top of the antenna is about 51' above ground, with the element ends at 35.5'. The gentle slope allows some variation in the actual mounting height, although the top is close to the 0.375 wavelength level.
The top center of the two elements shows a spacing of 24.6', with the element tips separated by about 9.4'. Drawing the tips toward each other introduces some degree of element end coupling, so the antenna is not a pure Yagi, but the level of coupling is not as extreme as in the Moxon. Drawing the elements toward each other also allows the builder to use ropes at the element ends and a common tie point for the structure on each side. The wire length on each side of center is about 33.2' for each half element in the array.
To load one of the elements for reflector duty, we need about 65 Ohms of inductive reactance. A shorted stub of about 20.2' or an open stub of about 54.8' (or increases in 1/2 wavelength increments for either) will do the job. A switching system like the one described earlier will create a reversible array.

Fig. 37 gives us some idea of how well the antenna will perform at its low Vee height in terms of both azimuth and elevation. The TO angle is about 36 degrees, slightly higher than a Yagi at a 3/8 wavelength height, due to the drooping ends. Likewise, the gain is about a half-dB lower. However, the front-to-back ratio is typical Moxon, with a value of better than 20 dB. Fig. 38 shows the anticipated 50-Ohm SWR curve, which is also typical Moxon.

If you wish to see more of Carrol's 40-meter reversible beam ideas, including improvements on the stub system outlined here, see "Two-Element 40-Meter Switched Beam," ARRL Antenna Compendium, Vol. 6 (Newington: ARRL, 1999), pp. 23-25.
Let's close with one more idea--something that you can do with a Yagi but not a Moxon rectangle. Suppose that you want a simpler switching arrangement, something that you can do in the shack. Then examine Fig. 39.

With driver-reflector Yagis, you can layout 2 of them using the same reflector. The dimensions in the Yagi table will work fine, because the unused driver has almost no effect at all on the performance of the reflector and the active driver. Separate lines to an in-shack switch also mean that the line lengths are not at all critical, and the lines may be closely paralleled structurally on their way from the shack to the antenna. All of the Yagi data will apply to this simple reversible Yagi, whatever the band you choose. Its only demerit is the need for a third wire and the spacing from the reflector. So a 20' front-to-back 40-meter Yagi becomes 40'. But if you have the space in this dimension, the ease of tune-up may offset the work of stringing the third wire.
We have not covered all of the many ways to work with 2-element wire beams on the lower HF bands. For example, we can make an open-sleeve coupled pair for covering both ends (but not the middle) of the 80/75-meter band using 4 wires and only 1 feedpoint. (If you are interested, see Some Notes on Lower HF Wire Beams for details.) The total space is only about 3' larger than needed for an 2-element Yagi for 3.6 MHz alone. I toss this note in only to demonstrate that once you get started, the possibilities are nearly endless.
We have focused--both in this set of notes and in Part 1 at the last FDIM--on the principles as well as the practicalities of 2-element arrays. As well, we have focused on uni-directional arrays and by-passed the fascinating world of bi-directional arrays, such as the 8JK and the lazy-H. The more you understand about 2-element directional performance--whether in the form of a parasitic Yagi, a phased array, or a parasitic alternative beam like the Moxon rectangle, the better your position to either build or buy successfully.
We have not focused in the main upon construction, except for the exercises last year on stepped-diameter Yagi elements and on some casual notes in this session. You will want to examine as many articles and books as you can find on good construction techniques. Your objectives should be twofold: 1. Find out what techniques offer the best probability of a safe, durable, and electrically effective array; 2. Discover which techniques best suit the materials and building skills that you have or want to develop. Combine the two, and you are ready to step up from a single element antenna to the world of 2-element arrays.
Once you have successfully mastered a 2-element antenna, can 3 or more elements be far behind?
Updated 5-24-2002. © L. B. Cebik, W4RNL. Data may be used for personal purposes, but may not be reproduced for publication in print or any other medium without permission of the author.